"AM" Application Manager
Database & solutions for all AppImages and portable apps for GNU/Linux!
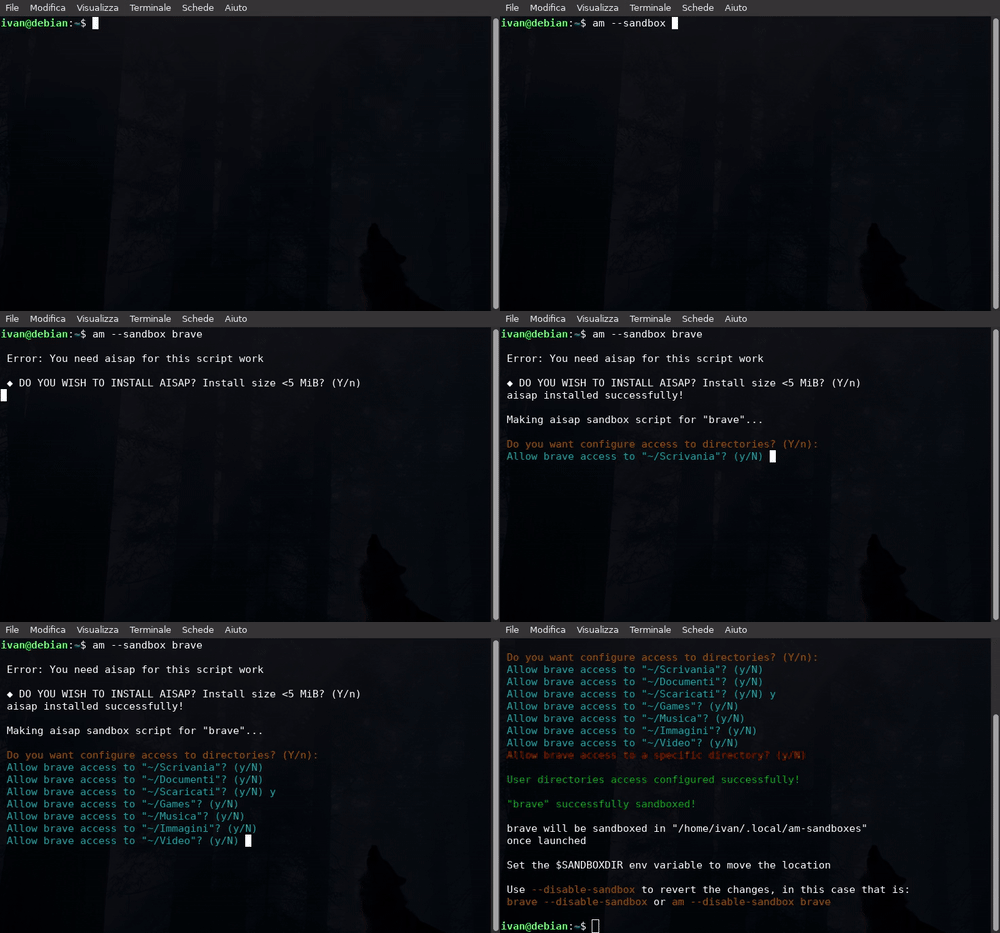 |
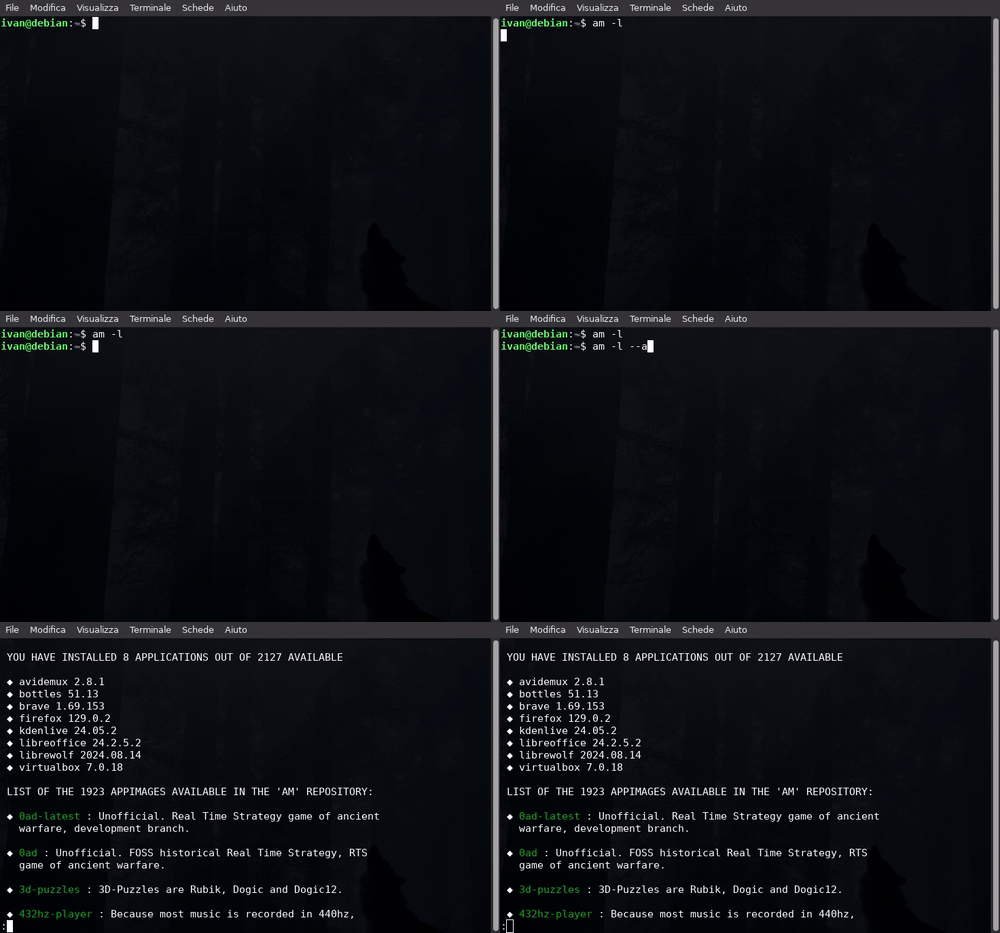 |
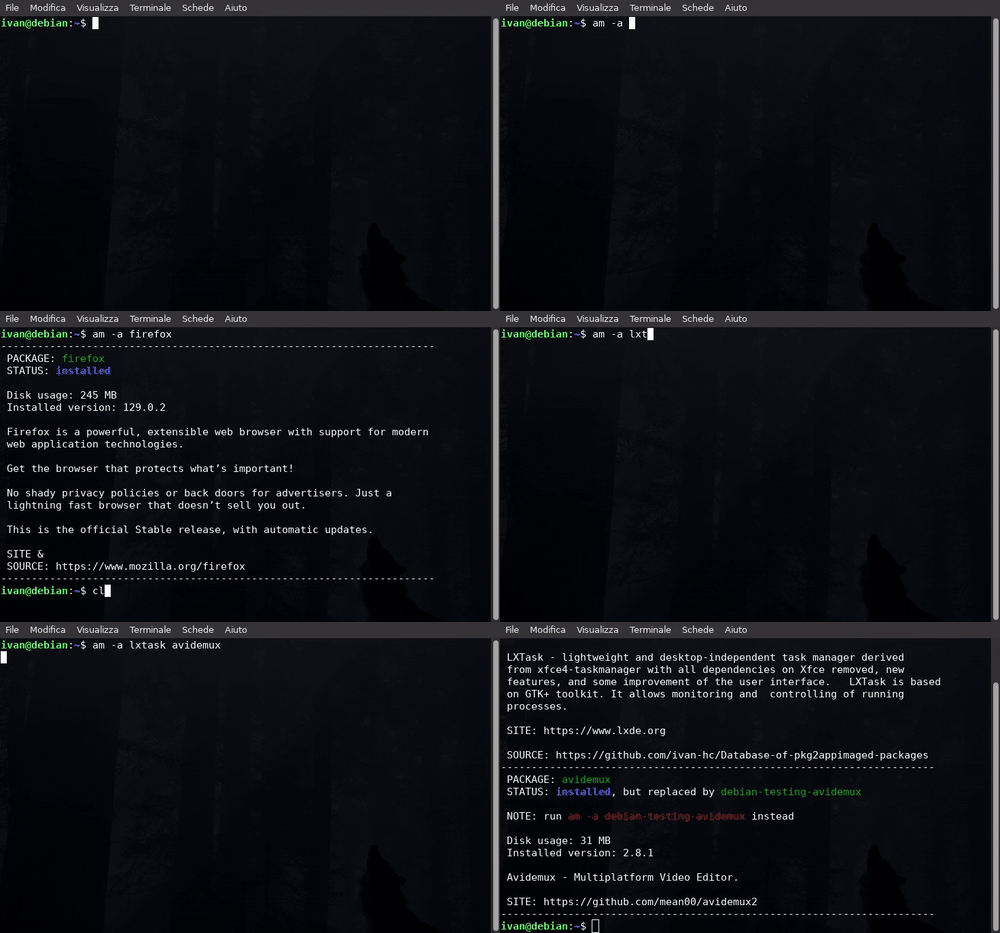 |
|---|---|---|
| sandbox AppImages | list available apps | info about the apps |
 |
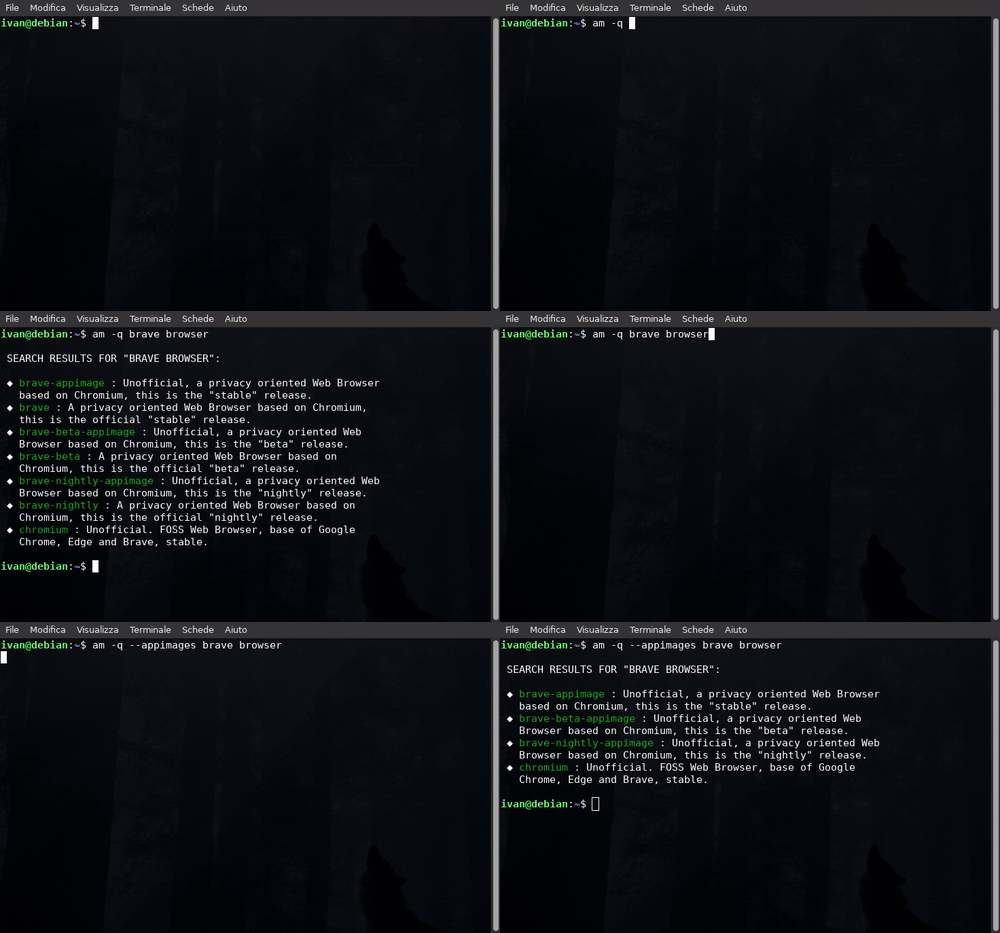 |
 |
| install applications | query lists using keywords | show the installed apps |
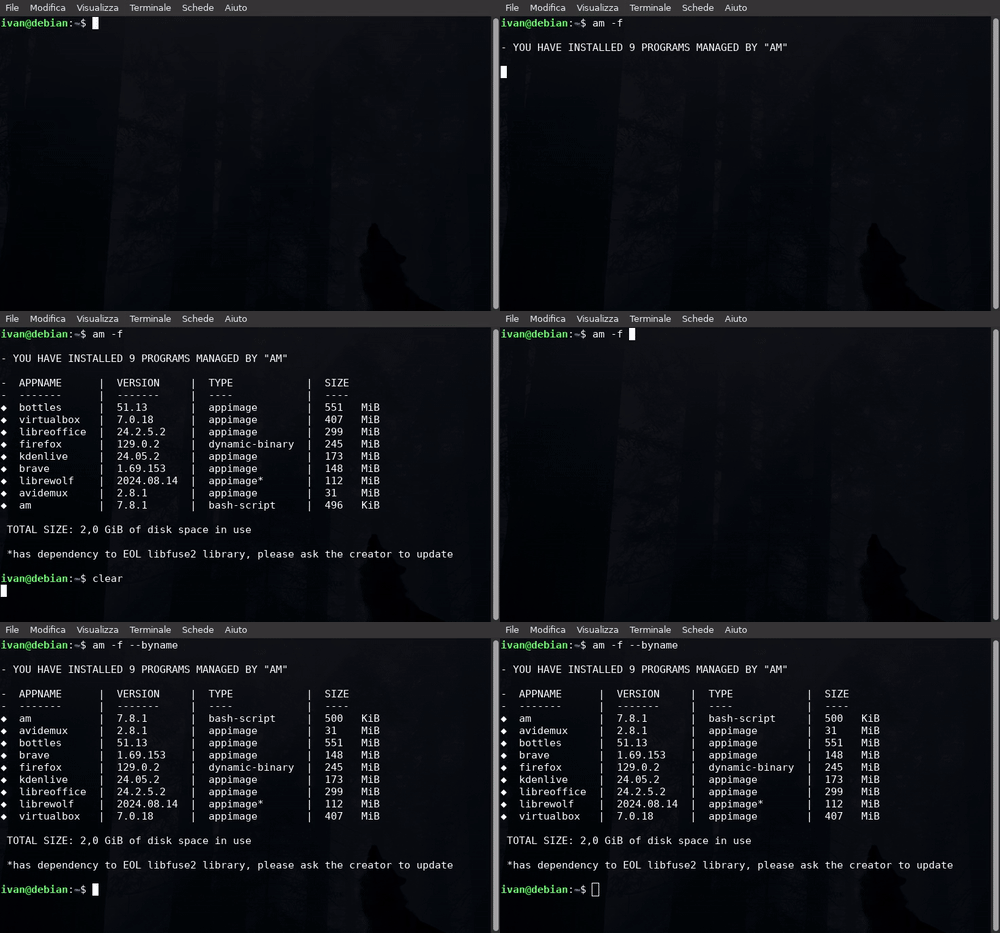
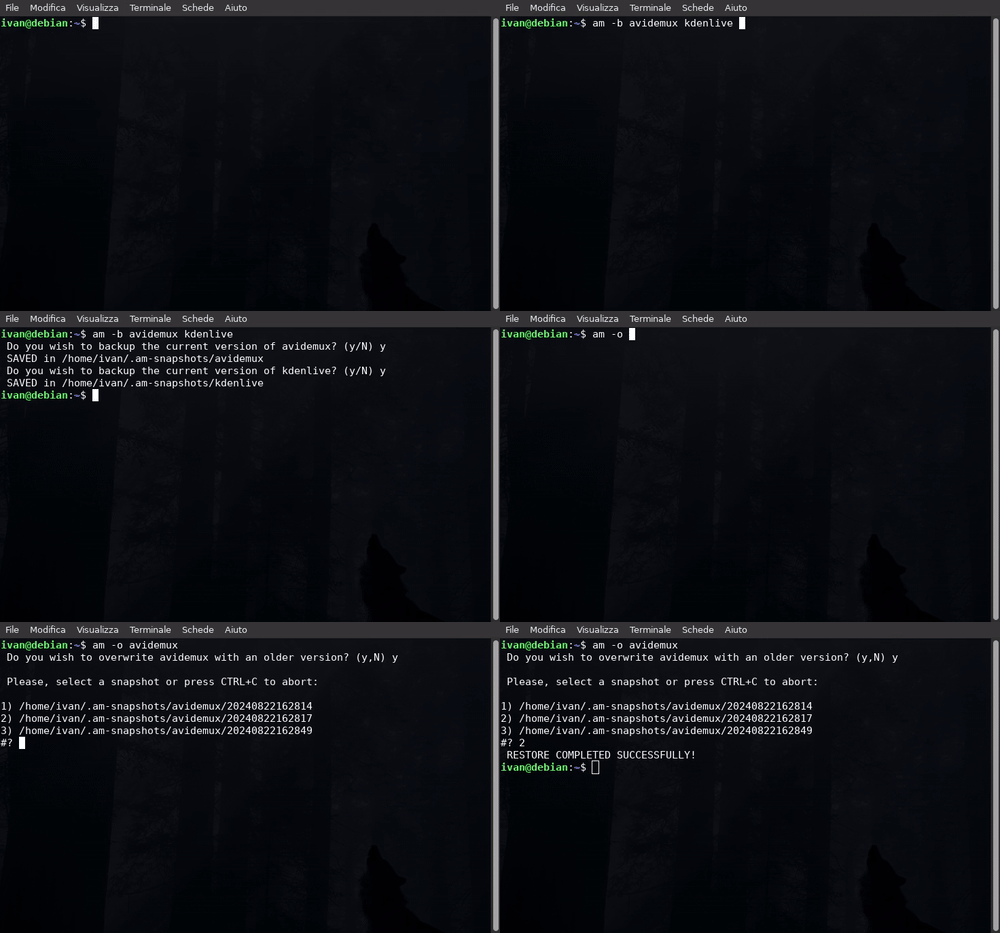 |
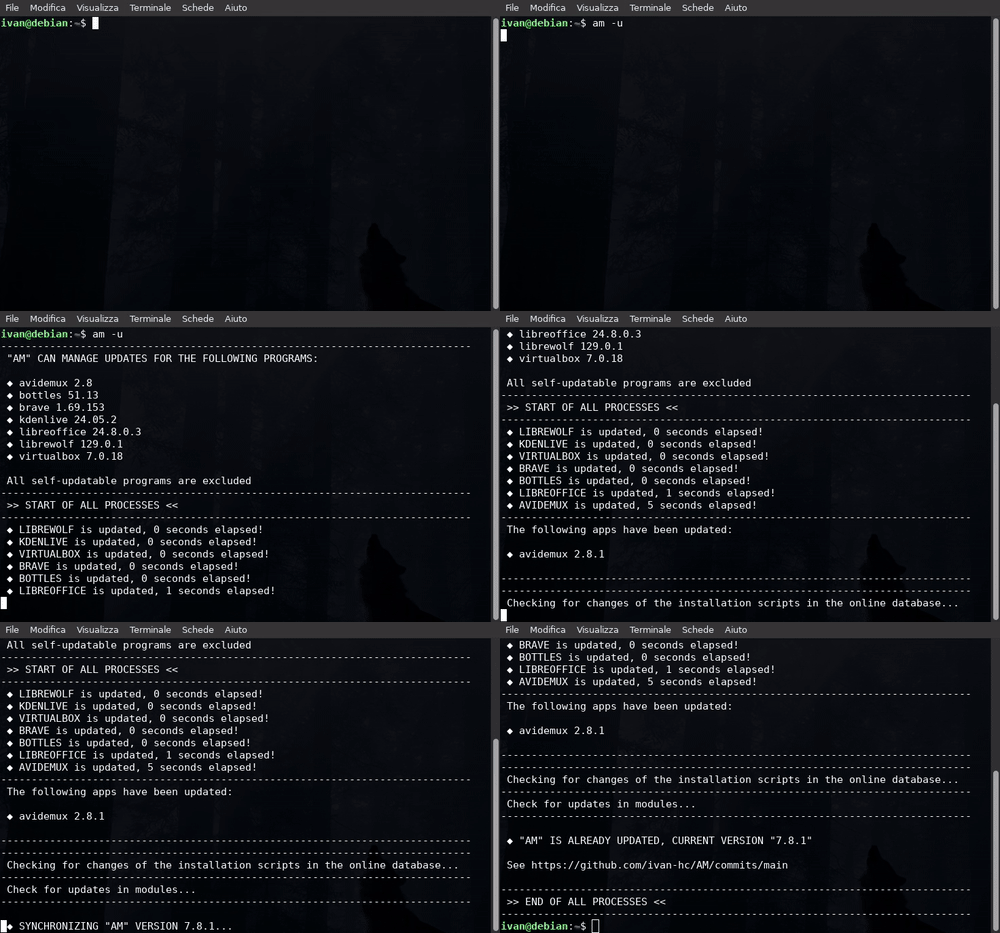 |
 |
| create and restore snapshots | update everything | get rid of libfuse2 |
"AM"/"AppMan" is a set of scripts and modules for installing, updating, and managing AppImage packages and other portable formats, in the same way that APT manages DEBs packages, DNF the RPMs, and so on... using a large database of Shell scripts inspired by the Arch User Repository, each dedicated to an app or set of applications.
"AM"/"AppMan" aims to be the default package manager for all AppImage packages, giving them a home to stay.
You can consult the entire list of managed apps at portable-linux-apps.github.io/apps.
What does it do?
"AM" easily integrates portable programs and AppImages system-wide (by default) or locally (using the --user flag), allows for their updates and management from the command line, integrates them into the application menu and can even assemble them on the fly as an AUR helper.
"AM" is just a tool to provide applications easily and quickly and is only responsible for integrating the AppImages into the system and installing the various programs available, respecting the following order:
- creation of the base directories and the removal script
- download of the package
- creation of the version file and the update script
- possibly, extraction of the icons and .desktop files
What doesn't it do!
"AM" is NOT responsible for the malfunction of individual apps! This is a problem of those who develop or package them upstream.
You can use the command am -a {PROGRAM} to view the description and get the sources to contact the program maintainers, or am -d {PROGRAM} to download and read the script on your desktop to trace and reach the source safely.
Main index
-
Using the "AM-installer" script to choose between local and system-wide installation
Translate "AM" in your local language
How to update all programs, for real!
Instructions for Linux Distro Maintainers
Installation
To install "AM" you must first install the "core" dependencies from your package manager:
- "
coreutils" (contains "cat", "chmod", "chown"...); - "
curl", to check URLs; - "
grep", to check files; - "
sed", to edit/adapt installed files; - "
wget" to download all programs and update "AM" itself. - "
sudo" or "doas", for installing and removing programs at the system level.
Additionally, you may need these optional dependencies, click here.
- "
binutils", contains a series of basic commands, including "ar" which extracts .deb packages; - "
less", to read the ever-longer lists; - "
unzip", to extract .zip packages; - "
tar", to extract .tar* packages; - "
zsync", required by very few programs and AppImages (although it is mentioned in all installation scripts, it is often disabled because the managed .zsync files are often broken, especially for apps hosted on github.com).
Using the "AM-installer" script to choose between local and system-wide installation
The "AM-INSTALLER" script allows you to choose "AppMan" instead of "AM", briefly explaining the differences between the two.
Copy/paste the following one line command to download and run the "AM-INSTALLER" script
wget -q https://raw.githubusercontent.com/ivan-hc/AM/main/AM-INSTALLER && chmod a+x ./AM-INSTALLER && ./AM-INSTALLER && rm ./AM-INSTALLER
...below, the screenshot of what will appear.
Type "1" to install "AM", "2" to install "AppMan". Any other key will abort the installation.
Installation is complete!
Run am -h or jump to "Usage" to see all the available options.
Using "GIT" (only system-wide installation)
Copy/paste the following commands
git clone https://github.com/ivan-hc/AM.git
cd AM
chmod a+x INSTALL
sudo ./INSTALL
Using a one-line command (only system-wide installation)
Copy/paste the following one line command command
wget https://raw.githubusercontent.com/ivan-hc/AM/main/INSTALL && chmod a+x ./INSTALL && sudo ./INSTALL && rm ./INSTALL
This is definitely the quickest method of all!
NOTE, the reason why I gave priority to the "AM-INSTALLER" script in this guide is because "AM" can be used in different forms. In fact, not all users can afford to install "AM" with root privileges. That's why "AppMan" also exists.
What is AppMan?
AppMan is a portable version of "AM", limited to installing and managing apps only locally and without root privileges.
The command name changes, from am to appman, but the script is the same.
"AM" on the contrary, provides a "fixed" installation, but can install and manage apps both locally and at the system level.
- "AM" is for privileged users who want to install and manage apps at multiple levels
- "AppMan" is the way to go for non-privileged users or those who don't have great needs
If you want to know more about "AppMan", visit https://github.com/ivan-hc/AppMan
AM installation structure
The classic "AM" installation has the following structure:
/opt/am/APP-MANAGER ==> /usr/local/bin/am
/opt/am/modules
/opt/am/remove
Where the command /usr/local/bin/am is just a symbolic link to /opt/am/APP-MANAGER. The directory /opt/am/modules contains the modules "not vital" for "AM" but necessary for managing the apps. The script /opt/am/remove is instead necessary for removing "AM".
Uninstall
To uninstall "AM" simply run this command:
sudo /opt/am/remove
or from the CLI directly
am -R am
NOTE, it is recommended to remove apps first using the -R option, and then "AM", since locally installed apps may have a different path than /opt, see "How are apps installed", below.
If you are an AppMan user, appman is a portable script, you can simply remove it manually. If you used AM-INSTALLER, you simply need to remove the $HOME/.local/bin/appman script. To remove applications, the same rule as AM, above, applies. Their location is the one you indicated in the $HOME/.config/appman/appman-config file.
How are apps installed
The system-wide AppImage integration has the following structure:
/opt/$PROGRAM/
/opt/$PROGRAM/$PROGRAM
/opt/$PROGRAM/AM-updater
/opt/$PROGRAM/remove
/opt/$PROGRAM/icons/$ICON-NAME
/usr/local/bin/$PROGRAM
/usr/local/share/applications/$PROGRAM-AM.desktop
Locally installed apps can have a directory of your choice, depending on what you decided when you first started am -i --user {PROGRAM} or when you started appman (if you chose AppMan) or by using the am --user command.
In fact, the --user command can be used as a "flag" for application installation options, allowing you to integrate them locally and without root permissions, as AppMan does.
For example, let's say you want to create and use the /home/USER/Applicazioni directory, here is the structure of a locally embedded AppImage:
~/Applicazioni/$PROGRAM/
~/Applicazioni/$PROGRAM/$PROGRAM
~/Applicazioni/$PROGRAM/AM-updater
~/Applicazioni/$PROGRAM/remove
~/Applicazioni/$PROGRAM/icons/$ICON-NAME
~/.local/bin/$PROGRAM
~/.local/share/applications/$PROGRAM-AM.desktop
How to set the path to local apps
The configuration file for the path to locally installed applications is located in ~/.config/appman and contains the path you specified when you first launched an option to install applications using the --user flag, for example:
am -i --user {PROGRAM}
If you are an AppMan user, you can simply launch any option.
When you first launch it, you will be asked to specify a path to the applications. You can specify any directory or subdirectory you want, even outside of $HOME, as long as it is not privileged. Even a USB stick.
NOTE: by modifying the contents of ~/.config/appman, you will only change the paths for any subsequent operation, while apps and modules stored in the old path will not be manageable. It is recommended to remove the apps first.
What programs can be installed
"AM" installs, removes, updates and manages only standalone programs, ie those programs that can be run from a single directory in which they are contained.
- PORTABLE PROGRAMS from official sources (see Firefox, Thunderbird, NodeJS, Platform Tools...), extracted from official .deb/tar/zip packages.
- APPIMAGES, from both official and unofficial sources (I also create unofficial AppImages), or compiled on-the-fly with pkg2appimage and appimagetool, like an AUR helper, from official archives.
- FIREFOX PROFILES to run as webapps, the ones with suffix "ffwa-" in the apps list.
- THIRD-PARTY LIBRARIES if they are missing in your repositories.
The database aims to be a reference point where you can download all the AppImage packages scattered around the web, otherwise unobtainable, as you would expect from any package manager, through specific installation scripts for each application, as happens with the AUR PKGBUILDs, on Arch Linux. You can see all of them here, divided by architecture.
You can view basic information, site links and sources using the related command am -a {PROGRAM}, or visit portable-linux-apps.github.io/apps.
Supported third-party databases
Another feature of "AM" is extensibility, thanks to the management of applications from external databases through the use of dedicated "flags" to be used during the installation process (option -i or install), the creation of lists (-l or list) and searches (-q or query)
                am -i --{FLAG} {PROGRAM}
                am -i --{FLAG} --user {PROGRAM}
                am -l --{FLAG}
These databases have the task of supporting and enriching the list of applications that can be installed via "AM".
To see the full list of flags, scroll to the bottom of the -h or help message.
Alternatively, perform searches (option -q or query) using the flag --all to identify the application.
Each application from external databases also has an identifying extension that corresponds to the database from which it comes.
Third-party databases can show basic information normally with the option -a or about, no flag is needed here. However, the name of the package will be shown with an extension equivalent to the flag used to install it. For example {PROGRAM} will be {PROGRAM}.{FLAG} if coming from the "{FLAG}" database.
Same thing, you can use am -i {PROGRAM}.{FLAG} or am -i --user {PROGRAM}.{FLAG} to install the program without using the flag.
How to replace AM database
One thing I care a lot about is continuity, and as I have seen over the years, not all open source developers are able to maintain a project. This could happen to me in the future. I don't want it to be that way.
Because of this, I have made some essential variables "customizable":
APPSDB, i.e. the "raw" directory of the architecture in use, containing the installation scripts (default value https://raw.githubusercontent.com/ivan-hc/AM/main/programs/$ARCH), this is mainly used in-i,-dand-s/-uAPPSDBLIST, i.e. the list of applications available for that architecture (default value https://raw.githubusercontent.com/ivan-hc/AM/main/programs/$ARCH-apps), this is used every time lists are updated, for example in-l,-qand-s/-uAPPIMAGES_LIST, i.e. the list of AppImages available in the database (default value https://raw.githubusercontent.com/Portable-Linux-Apps/Portable-Linux-Apps.github.io/main/x86_64-appimages), used in-iaand-l/-qwith the--appimagesflagAMCATALOGUEMARKDOWNS, i.e. the pages in .md format from the catalog of applications available in this database (default value https://portable-linux-apps.github.io/apps, add an appname with extension .md to see the content of one file), this is used in-aAMCATALOGUEICONS, i.e. the icons in .png format available in the catalog of applications available in this database (default value https://portable-linux-apps.github.io/icons, add an appname with extension .png to see one file), this is used in-i, in case the installation script fails to get an icon for the applicationAMSYNC, if set to "1" prevents AM from updating itself and updating modules when running-sor-u
it is enough to export the variables above and respect the destination file format (follow the URLs in parentheses) in case you decide to open a new community-driven database that can make up for the lack of support in this repository.
I did this to not tie users to this database and to allow them to use AM and all its features if I, Ivan, am unable to intervene for any reason.
There are many discontinuous projects. Should this become one too, it will not be obsolete.
Recommended packages
After installing AM, the following packages are a must have to make your life easier:
1) appimageupdatetool
appimageupdatetool (fork) is a tool to get delta updates of AppImages that support them, useful if you decide to install large AppImage packages (see "How to update all programs, for real!")
am -i appimageupdatetool
2) appimagetool
appimagetool is a tool used to create AppImage packages from AppDirs. "AM" uses this to convert old AppImages and remove their dependency on libfuse2 or to assemble AppImage packages on the fly from portable archives if a build script is available, like in an AUR helper (see "Convert Type2 AppImages requiring libfuse2 to New Generation AppImages" and "Option One: "build AppImages on-the-fly")
am -i appimagetool
3) aisap
aisap is a Bubblewrap frontend that allows you to isolate AppImages in a sandbox (see "Sandbox an AppImage")
am -i aisap
Do you own a repository for AppImages external to this database? Follow these instructions!
If you have a github repository where you build and publish AppImage packages and if for any reason your application is not in this database, add the following instructions:
To install and update my AppImage using "AM", simply run the following command:
am -e https://github.com/user/project appname keywordif you want to install and update it locally, run
am -e --user https://github.com/user/project appname keyword...or if you use AppMan
appman -e https://github.com/user/project appname keyword
Replace appname with the name of the application that will also be used via command line... keyword is optional, depending on whether you have more than one AppImage in the "releases" section of your repository.
Of course, replace user/project with your username and the repository name.
For more details on how the -e or extra option works, see here.
| Back to "Main Index" |
|---|
Translate "AM" in your local language
Since version 9.8 it is possible to add and use alternative languages via the translate option, use:
am translate
or if using AppMan
appman translate
The command accepts reliable language codes (for example "it" for Italian, or "sr" for Serbian). In case the desired language is not in the database, it will default to English (code "en").
In the example, "AM" in Italian, Czech and Serbian
https://github.com/user-attachments/assets/a18f48b0-f389-4e94-a576-0031354d3cd5
See "translations/README.md" for more information!
| How to translate "AM" | Back to "Main Index" |
|---|
How to update all programs, for real!
Most of the apps managed by "AM" have a script called AM-updater. It tells how updates are checked when running the am -u command.
In most cases, the "version comparison" is used between the installed one (file version) and an online source (official or not, depending on how hard or easy it is to find a download URL or just a number, using the terminal). In other cases, AppImages can rely on "appimageupdatetool" if they support "delta updates" (install it with the command am -i appimageupdatetool). However, there are some programs that update themselves (and among these the most famous is certainly Firefox, all official development builds).
How to update all installed apps
Option -u or update updates all the installed apps and keeps "AM"/"AppMan" in sync with the latest version and all latest bug fixes.
- To update only the programs, use
am -u --apps/appman -u --apps - To update just one program, use
am -u $PROGRAM/appman -u $PROGRAM - To update all the programs and "AM"/"AppMan" itself, just run the command
am -u/appman -u - To update only "AM"/"AppMan" and the modules use the option
-sinstead,am -s/appman -s
The -u option can also be combined with the --debug flag to show the output of installed application updates.
How to update everything using Topgrade
Keeping your system up to date usually involves invoking multiple package managers. This results in big, non-portable shell one-liners saved in your shell. To remedy this, Topgrade detects which tools you use and runs the appropriate commands to update them.
Install the "topgrade" package using the command
am -i topgrade
or
am -i --user topgrade
Visit github.com/topgrade-rs/topgrade to learn more.
| Back to "Main Index" |
|---|
OPTIONS
Click here to see the full list of options
USAGE:
	am {OPTION}
	am {OPTION} {PROGRAM}
about, -a
am -a {PROGRAM}
Description:
Shows more info about one or more apps.
apikey
	am apikey {Github Token}
	am apikey delete
Description:
Accede to github APIs using your personal access tokens. The file named "ghapikey.txt" will be saved in ~/.local/share/AM. Use "del" to remove it.
backup, -b
am -b {PROGRAM}
Description:
Create a snapshot of the current version of an installed program.
clean, -c
am -c
Description:
Removes all the unnecessary files and folders.
config, -C, --config
am -C {PROGRAM}
Description:
Set a dedicated $XDG_CONFIG_HOME for one or more AppImages.
downgrade, --rollback
am --rollback {PROGRAM}
Description:
Download an older or specific app version.
download, -d
	am -d {PROGRAM}
	am -d --convert {PROGRAM}
Description:
Download one or more installation scripts to your desktop or convert them to local installers for "AppMan". To test the scripts, use the "am -i '/path/to/script'" command or enter the directory of the script and run the "am -i ./script" command, even using dedicated flags, if necessary (see "-i").
extra, -e
	am -e user/project {APPNAME}
	am -e user/project {APPNAME} {KEYWORD}
Description:
Install AppImages from github.com, outside the database. This allows you to install, update and manage them all like the others. Where "user/project" can be the whole URL to the github repository, give a name to the program so that it can be used from the command line. Optionally, add an "univoque" keyword if multiple AppImages are listed.
NOTE: Since this is an "install" option, you can add the "--user" flag (before "user/project") to install apps locally. See "--user" at the bottom to learn more.
files, -f, -fi
	am -f
	am -f --byname
	am -f --less
Description:
Shows the list of all installed programs, with sizes. By default apps are sorted by size, use "--byname" to sort by name. With the option "--less" it shows only the number of installed apps. Option "-fi" only shows installed apps, not the AppImages integrated with the "--launcher" option.
help, -h
am -h
Description:
Prints this message.
hide
am hide {PROGRAM}
Description:
Prevents an installed application from being shown or managed by "am".
home, -H, --home
am -H {PROGRAM}
Description:
Set a dedicated $HOME directory for one or more AppImages.
-HC, -CH
am -HC {PROGRAM}
Description:
Set dedicated $HOME and $XDG_CONFIG_HOME directories for one or more AppImages.
icons, --icons
	am --icons {PROGRAM}
	am --icons --all
Description:
Allow installed apps to use system icon themes. You can specify the name of the apps to change or use the "--all" flag to change all of them at once. This will remove the icon path from the .desktop file and add the symbolic link of all available icons in the ~/.local/share/icons/hicolor/scalable/apps directory. The "--icons" option can be used as "flag" in the "-i" and "-ia" options.
install, -i
	am -i {PROGRAM}
	am -i --debug {PROGRAM}
	am -i --force-latest {PROGRAM}
	am -i --icons {PROGRAM}
	am -i --sandbox {PROGRAM}
Description:
Install one or more programs or libraries from the list. With the "--debug" option you can see log messages to debug the script. For more details on "--force-latest", see the dedicated option, below. Use the "--icons" flag to allow the program to use icon themes. It can also be extended with additional flags. The "--sandbox" flag allows you to set sandboxes for AppImage packages.
NOTE: Since this is an "install" option, you can add the "--user" flag to install apps locally. See "--user" at the bottom to learn more.
install-appimage, -ia, -ias
	am -ia {PROGRAM}
	am -ia --debug {PROGRAM}
	am -ia --force-latest {PROGRAM}
	am -ia --icons {PROGRAM}
	am -ia --sandbox {PROGRAM}
	am -ias {PROGRAM}
Description:
Same as "install" (see above) but for AppImages only. Option "-ias" (aka Install AppImage & Sandox) is equivalent to "-ia --sandbox", to set sandboxes for AppImage packages.
list, -l
	am -l
	am -l --all
	am -l --appimages
	am -l --portable
Description:
Shows the list of all the apps available. Without flags only shows the apps in the "AM" database, add the "--appimages" to show only the AppImages or "--portable" to show other formats from the "AM" database. The "--all" flag allows you to consult the set of all supported third-party databases. It can also be extended with additional flags.
lock
am lock {PROGRAM}
Description:
Prevent an application being updated, if it has an"AM-updater" script.
newrepo, neodb
	am newrepo add {URL}\{PATH}
	am newrepo select
	am newrepo on\off
	am newrepo purge
	am newrepo info
Description:
Set a new default repo, use "add" to append the path to a local directory or an online URL, then use "select" to use it by default, a message will warn you about the usage of this repo instead of the default one. Use "on"/"off" to enable/disable it. Use "purge" to remove all 3rd party repos. Use "info" to see the source from where installation scripts and lists are taken.
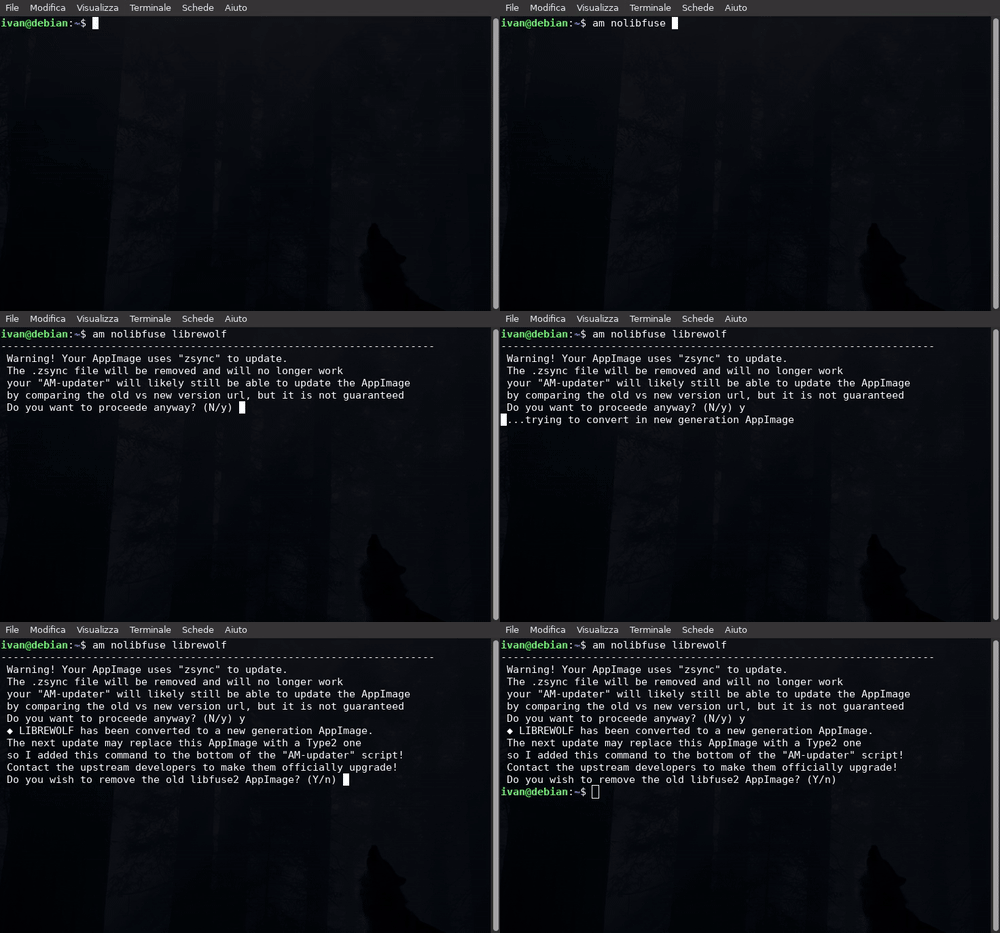
nolibfuse
am nolibfuse {PROGRAM}
Description:
Convert old AppImages and get rid of "libfuse2" dependence.
overwrite, -o
am -o {PROGRAM}
Description:
Overwrite apps with snapshots saved previously (see "-b").
query, -q
	am -q {KEYWORD}
	am -q --all {KEYWORD}
	am -q --appimages {KEYWORD}
	am -q --portable {KEYWORD}
	am -q --pkg {PROGRAM1} {PROGRAM2}
Description:
Search for keywords in the list of available applications, add the "--appimages" option to list only the AppImages, "--portable" option to list only the portable apps or add "--pkg" to list multiple programs at once. The "--all" flag allows you to consult the set of all supported databases.
reinstall
	am reinstall
	am reinstall --all
Description:
Reinstall only programs whose installation script has been modified in AM's online database. Use the "--all" flag to reinstall everything instead.
NOTE, this only works with the "AM" database. Apps installed with the "-e" option and custom scripts created with the "-t" option are not supported.
remove, -r
am -r {PROGRAM}
Description:
Removes one or more apps, requires confirmation.
-R
am -R {PROGRAM}
Description:
Removes one or more apps without asking.
sandbox, --sandbox
am sandbox {PROGRAM}
Description:
Run an AppImage in a sandbox using Aisap.
NOTE, "--sandbox" can be used as a flag in "-i" and "-ia" or can be replaced using the option "-ias" (aka Install AppImage & Sandox).
sync, -s
am -s
Description:
Updates this script to the latest version hosted.
template, -t
am -t {PROGRAM}
Description:
Generate a custom installation script. To test the scripts, use the "am -i '/path/to/script'" command or enter the directory of the script and run the "am -i ./script" command, even using dedicated flags, if necessary (see "-i").
translate, --translate
	am --translate
	am --translate {CODE}
Description:
Download and set one or more language packs (if available), set "am" to English (default), your language or other languages.
See translations/README.md for more information.
unhide
am unhide {PROGRAM}
Description:
Allow a hidden app to be shown and managed again (nulls "hide").
unlock
am unlock {PROGRAM}
Description:
Unlock updates for the selected program (nulls "lock").
update, -u, -U
	am -u
	am -u --apps
	am -u --debug
	am -u --apps --debug
	am -u {PROGRAM}
	am -u --debug {PROGRAM}
	am -u --launcher
Description:
Update everything. Add "--apps" to update only the apps or write only the apps you want to update by adding their names. Add the "--debug" flag to view the output of AM-updater scripts. Add the "--launcher" flag to try to update only local AppImages integrated with the "--launcher" option (see "--launcher").
version, -v
am -v
Description:
Shows the version.
--devmode-disable
am --devmode-disable
Description:
Undo "--devmode-enable" (see below).
--devmode-enable
am --devmode-enable
Description:
Use the development branch (at your own risk).
--disable-notifications
am --disable-notifications
Description:
Disable notifications during apps update.
--disable-sandbox
am --disable-sandbox {PROGRAM}
Description:
Disable the sandbox for the selected app.
--enable-notifications
am --enable-notifications
Description:
Enable notifications during apps update (nulls "--disable-notifications").
--force-latest
am --force-latest {PROGRAM}
Description:
Downgrades an installed app from pre-release to "latest".
--launcher
am --launcher /path/to/${APPIMAGE}
Description:
Drag/drop one or more AppImages in the terminal and embed them in the apps menu and customize a command to use from the CLI.
NOTE that "--launcher" can be used as a flag in "-u" to try to update the integrated AppImages (see "-u"). This works only if "appimageupdatetool" is installed and delta updates are supported. This flag does not work miracles, I strongly suggest to use options "-ia" and "-e" instead.
--system
am --system
Description:
Switch "AM" back to "AM" from "AppMan Mode" (see "--user").
--user
am --user
Description:
Made "AM" run in "AppMan Mode", locally, useful for unprivileged users. This option only works with "AM".
The "--user" option can also be used just as a "flag" for installation options. For example:
-
Use it to install applications locally, option "
-i" or "install":am -i --user {PROGRAM} -
Also suboptions of "-i" can work with this flag:
am -i --user --debug {PROGRAM} am -i --user --force-latest {PROGRAM} am -i --user --icons {PROGRAM} am -i --user --debug --force-latest {PROGRAM} am -i --user --debug --force-latest --icons {PROGRAM} -
Same for AppImages only, option "
-ia" or "install-appimage":am -ia --user {PROGRAM} am -ia --user --debug {PROGRAM} am -ia --user --force-latest {PROGRAM} am -ia --user --icons {PROGRAM} am -ia --user --debug --force-latest {PROGRAM} am -ia --user --debug --force-latest --icons {PROGRAM} -
External AppImages can be installed like this as well, option "
-e" or "extra":am -e --user user/project {APPNAME} am -e --user user/project {APPNAME} {KEYWORD}
NOTE, "AM" 9 or higher is also able to, update and manage apps locally, by default, and without having to switch to "AppMan Mode".
THIRD-PARTY FLAGS:
All flags intended for third-party databases are listed at the bottom of the -h or help message, their description and synopsis will be something like this:
	am -i --{FLAG} {PROGRAM}
	am -i --{FLAG} --user {PROGRAM}
	am -l --{FLAG}
Description:
This is a flag to use in "-i" and "-l" to install/list {FLAG}s from https://site.name/source/repository. You can also use it in "-q" as a keyword. For installations you can use .{FLAG} as the package extension instead of using the flag.
| Back to "Main Index" |
|---|
Guides and tutorials
Below you can access the documentation pages related to the use of "AM", complete with tutorials and demonstration videos, depending on the topic you are interested in:
- Install applications
- Install only AppImages
- Install AppImages not listed in this database but available in other github repos
- List the installed applications
- List and query all the applications available on the database
- Update all
- Backup and restore installed apps using snapshots
- Remove one or more applications
- Convert Type2 AppImages requiring libfuse2 to New Generation AppImages
- Integrate local AppImages into the menu by dragging and dropping them
- Sandbox an AppImage
- How to update or remove apps manually
- Downgrade an installed app to a previous version
- How to use multiple versions of the same application
- Create and test your own installation script
- Third-party databases for applications (NeoDB)
- BSD, freeBSD and derivative systems: configuration and troubleshooting
| Back to "Main Index" |
|---|
Instructions for Linux Distro Maintainers
Glossary:
- System
am(/usr/bin/am) - Local-system
am(/usr/local/bin/amsymlinked to/opt/am/APP-MANAGER) - Local-user
appman($HOME/.local/bin/appman) - APPMANCONFIG=
$XDG_CONFIG_HOME/appman-config
You can package "AM" for Debian, Fedora, Arch Linux, Gentoo and many more GNU/Linux distros using the following configuration:
/usr/bin/am/usr/lib/am/modules/
where "/usr/bin/am" is the script "APP-MANAGER" and "/usr/lib/am/modules/" is the directory "modules" with all its content.
Applications will continue to be installed in /opt/ or $HOME location when --user flag is used for installation, according to the $APPMANCONFIG file configuration.
What changes from the locally-installed am or appman is the update process of the CLI and modules.
System am intentionally ignores updates of CLI and modules in this scenario & hands that responsibility to the distro package manager in use (APT, DNF, PacMan/YaY...)
--devmode option is completely disabled in this mode, as it's only intended to update locally-installed am or appman in run-time to dev branch.
You as a packager or distro-maintainer can optionally make am-dev or am-git package separately from am for this usage.
Generation of shell completions in $HOME is also disabled in this mode, as they can be easily packaged in respective system directories.
That can be done like this:
Bash
Located in /usr/share/bash-completion/completions/am:
complete -W "$(cat "${XDG_DATA_HOME:-$HOME/.local/share}/AM/list" 2>/dev/null)" am
Zsh
Zsh completion currently depends on the bash one, which can be inserted into zshrc:
autoload bashcompinit
bashcompinit
source "/usr/share/bash-completion/completions/am"
Fish
Located in /usr/share/fish/vendor_completions.d/am:
set data_home "$XDG_DATA_HOME"
if test -z "$data_home"
    set data_home "$HOME/.local/share"
end
complete -c am -f -a "(cat "$data_home/AM/list" 2>/dev/null)"
Another recommendation is to use wget instead of wget2 (in Fedora, it's called wget1 & you also need to install wget1-wget package, so it becomes symlinked to wget).
wget gives the prettier & generally working output, while wget2 has a bug where it clears out the output of itself, making the application installation & update progress hardly visible.
Distro examples: Gidro-OS
For the example on how the distribution installs am, you can check Gidro-OS, custom image based on Fedora Silverblue by @fiftydinar:
https://github.com/fiftydinar/gidro-os/blob/main/recipes/recipe-appimages.yml
| Back to "Main Index" |
|---|
Troubleshooting
Below you can access documentation pages for common issues and frequently asked questions:
- An application does not work, is old and unsupported
- Cannot download or update an application
- Cannot mount and run AppImages
- Failed to open squashfs image
- Spyware, malware and dangerous software
- Stop AppImage prompt to create its own launcher, desktop integration and doubled launchers
- The script points to "releases" instead of downloading the latest stable
- Ubuntu mess
- Wrong download link
| Back to "Main Index" |
|---|
Related projects
External tools and forks used in this project
- aisap, sandboxing solutions for AppImages
- appimagetool, get rid of libfuse2 from your AppImages
- pkg2appimage, create AppImages on the fly from existing .deb packages
- repology, the encyclopedia of all software versions
Partner projects, i.e. those that actively contribute to this project
- Soarpkgs, Largest Collection of Multi-Platform Pre-Compiled Static Binaries
My other projects
- AppImaGen, easily create AppImages from Ubuntu PPAs or Debian using pkg2appimage and appimagetool
- ArchImage, create AppImages for all distributions using Arch Linux packages. Powered by JuNest
- Firefox for Linux scripts, easily install the official releases of Firefox for Linux
- My AppImage packages the complete list of packages managed by me and available in this database
- Snap2AppImage, try to convert Snap packages to AppImages
You can support me and my work on ko-fi.com and PayPal.me. Thank you!
© 2020-present Ivan Alessandro Sala aka 'Ivan-HC' - I'm here just for fun!
| ko-fi.com | PayPal.me | Install "AM"/"AppMan" | "Main Index" |
|---|